Contents I, Introduction II, Controls III, General Tips IV, Emulation Hints V, Walkthrough In this room kill the small gels and grab the From (C5) east, north,
north, and fight Aquamentus. His weakness is that he moves very slowly,
and his fireballs separate after shooting, making it easy to dodge
between them. If you still have full health just shoot away at him with
your sword, otherwise get in behind him and do your best to attack
while dodging. When he's gone grab the Now the timer should be 0:20, so it is time to get the time related From here go west, north, north, east and enter the cave for the Bomb the southern face and head south. Grab the To defeat Dodongo, place bombs right in front of its face. It should
then walk onto the bomb, eat it, and take damage. Alternately, just
walk right up to him and place the bomb onto his body and it should end
up in his stomach anyway. Collect the From the shop go two screens left, cross the bridge and use the candle to burn away the 3 trees (C2) .
Go up, left and burn the lonely bush in the lower left corner and you'll have your pick of either Red Medicine or an extra
Side Quest: If you want (but not recommended) and if you are very patient and skilled with your control pad (to challenge the Tornadoes), you can get the white sword early yet. From Level 3 go two screens left, burn the bush to meet an old man saying "go north, west, south, west in the Lost woods" (A1) - use these indications you've just been given to go through the lost woods (go right and up, and then follow the old man's hint). Two screens up you must face the Tornadoes (A3) now, which are hard to avoid. If you manage you can get the White Sword (A5)early (be sure to have 5 Heart Containers). Otherwise, see "Overworld (between Level 3 - 4)" to get this sword easier. The strategy is simple: using your bow, shoot at each of the heads
to destroy it, then move onto another. It takes two shots to kill
a head. After each head is destroyed Manhandla moves a little faster,
and is very fast near the end. Bombs may work well at this point. When
you've killed it grab the Now go back to the shop (B4), buy the
I, Introduction - Review / Story
II, Controls
III, General Tips
IV, Emulation Hints - Emulator FAQ / Glitches
V, Walkthrough - Week 1 / Week 2 / Week 3 / Week 4
VI, Secrets - Heart Containers / Medicine Shops / Fairies / Shops / Warps / Hints....
VII, Time Related Events
VIII, Cheat - Pro Action Replay Codes / Time Change
IX, Items - Attack Items / Defence Items / Special Items...
X, Bestiary - Overworld Enemies / Dungeon Enemies / Traps / Bosses
XI, Other Sprites - Characters / Passways / Lost Sprites
XII, Fourth Quest - Introduction / Timeplan / Extra Items
XIII, Conclusion - Credits / Contact / Legal / Final Word / Text Versions
A, Review
First of all, let's make sure we all realize this: BS Zelda was a 16-bit remake of The Legend of
Zelda, which was released on the NES in the mid-80's. BS Zelda was only available in 1995 in
Japan via a satellite system that connected to the Super NES. The game was broadcasted on Sundays
from around 6 to 7, along with a TV show which gave info on the game and other Nintendo related
things. Unfortunately, players were only given a set number of hours to play, over the course of
four weeks (which is why the game stops after 57 minutes). Because this game was used to launch
the BS-X system, Link (the original lead character) has been replaced by the mascots for the BS
system (that is, unless you use a patch to play as him).
The game was broadcasted twice, Map 1 and Map 2. Map 2 can be compared with LoZ Second Quest, Nes, which has different dungeons and overworld but same gameplay.
Now writing about the first The Legend of Zelda is no easy task. What can you say about a game
that was for many people (myself included) a life changing experience? Trying to reduce into
words that sort of impact is pointless. It's like describing love, you can't, you have to feel it
at least once to understand. So we shall let the facts do the talking and suffice saying that BS
Zelda is indeed a very good remake.
Anyway, for those who never played the original Zelda, here's a simple description of the
gameplay (doesn't really make justice to it, but as said above, no description would). The game
is divided in two settings: the overworld and the underworld. Starting out in the overworld, you
are to explore a fantastic land of forests, rivers and mountains (believe me it was a truly
enchanting journey) with an important task find the underworld dungeons and recover the almighty
relic within, the Triforce. Only then, you would be allowed in the final dungeon to save the
Princess Zelda from the evil Ganon. Both settings are filled with hostile creatures(so many of
them for a game this old!) that constantly try to put an end to your quest. But you can fight
back with an enchanted sword capable of shooting beams of light and a large number of items like
a boomerang, a bow, bombs etc. The latter play an even more important role in opening hidden
passages for you so that you can progress through the dungeons or find helpful secrets. And
that's only one of the riddles the hero of this game is confronted with.
The world of Zelda proved to be so deep and elaborate that for many people it was, for the first
time, like really being drawn into a different world and the adventure of a lifetime.
As I said, BS Zelda is a great remake, even though this word is used loosely since the game has
all new maps in which to live your adventure; it enanches sound and graphic to the SNES quality
and introduces some new features like night time. It had a major downside because it originally
had a time limit, but most people will probably patch the game to "loop" so let's ignore that.
Actual downsides from the original NES game are that BS Zelda has a smaller overworld and doesn't
have a final dungeon before the last boss (and it's missing a couple enemies too), resulting in a
shorter game, but this was due to the limitations of the Satellaview so we'll have to tollerate it.
Speaking of loop though, one of the new features is a timer and, along with it, some timed events
that can be very interesting and useful. they include simple things like having all enemies on
screen vanish to more interesting ones like obstacles that are removed after a certain time. The
latter inevitably make the game more linear, like the later episodes in the series. To some
people this may be a serious change for the worse, but personally I don't mind, in fact I think
the game is actually made more enjoyable by knowing in what area of the map the next dungeon
should be. I mean, there's still plenty of exploring with all the secrets in this game and you
still have less knowledge than in ALttP where the dungeons were marked on the map (they are in
this one too, but only those of previous weeks, which was a necessity because you had little time
to catch up). Of course the game being not emulated perfectly shows you the location of the first
four dungeons right away (because unpatched it plays as week 3) but I believe that shouldn't
influence this review.
I could now give votes to the various aspects of this game, but by now you should know how much I
love this game and that this would only result in a series of nines.So instead I'll just say
this: BS The Legend of Zelda was the main reason I originally bought a PC (talk about killer
application) and I still play it more than many new games of today.
A brief history of this game on the net:
The only known dump was made by YuYu (I believe that's his handle). The game was dumped using a
console copier called the Super UFO Pro Drive VII, which could copy games to disk off the
Super Famicom Bulletin Service Satellite System. (thanks to NoaSQUARE@aol.com for the info.).
This dump would only work as week 3 with most emulators.
Enter the BS Zelda homepage and Roto, he has hacked the game so we can play from week 1 to week
4. The whirlpool and the statues not coming to life were blockades meant to be removed in later
weeks.
Here's how:
Week 1: Level 1-2 playable; the Candle isn't in the shop so you can't burn your way into the forest.
Week 2: Level 3-4 playable; a whirlpool prevents you from reaching the eastern part of Death Mountain.
Week 3: Level 5-6 playable; the statues don't come to life, making it impossible to pass into the western Death Mountain.
Week 4: Level 7-8 playable and the last boss appears near the end of your hour of play.
With the above fixed, the game can now (for the most part) be played the way it was supposed to
be. It has been our mission to promote this game as well as its sibling (Kodai no Sekiban) and
strive to improve their patches (with the addition of translations, for example) in the hope that
all Zelda fans may enjoy these lost games.
In accord with this mission, we present to you a complete guide for the game.
B, Story
BS Zelda is a remake of The Legend of Zelda originally published on the NES. Therefore the two
games have the same background story. There is however one difference: the starring character.
To this generation of players, that grew into Zelda fans with games like Majora's Mask and The
Wind Waker, seeing the main character with a baseball cap may be perfectly normal, but back in
the days of A Link to the Past, this was quite shocking. We have an explanation for this from
the other BS Zelda game, Kodai No Sekiban that had the same starring character(s) and explained
that this was a youth from another world (presumably ours, judging by the baseball cap).
It seems reasonable to assume that this was the case with the first BS Zelda too, but being it
the remake of a classic Zelda game rather than an all new game in which it is a plot point for
the hero to come from another dimension, this is obviously something that should be ignored
when trying to fit this game's story (and thus that of LoZ) among the other episodes in the
series.
So there you have it: this game has the very same story of LoZ and you can decide for yourself if
the starring character is still Link whose sprite was replaced with the BS-X mascotte (boy or
girl), or if it is a youth from far away, or from our world even, living the adventure that was
supposed to be of Link (or for the less strict and more imaginative, a youth from our world
helping out Link).
And now, especially for those that did not play the original Zelda, here is the story extracted
from the game's manual and made more vague concerning the identity of the hero:
A long, long time ago the World was in an age of Chaos. In the middle
of this chaos, in a little kingdom in the land of Hyrule, a legend was
being handed down from generation to generation, the legend of the
"Triforce"; golden triangles possessing mystical powers.
One day, an evil army attacked this peaceful little kingdom and stole
the Triceforce of Power. This army was led by Ganon, the powerful
Prince of Darkness who sought to plunge the World into fear and
darkness under his rule. Fearing his wicked rule, Zelda, the princess
of this kingdom, split up the Triforce of Wisdom into eight fragments
and hid them throughout the realm to save the last remaining Triforce
from the cluthes of the evil Ganon. At the same time, she commanded
her most trustworthy nursemaid, Impa, to secretly escape into the land
and go find somebody with enough courage to destroy the evil Ganon.
Upon hearing this, Ganon grew angry, imprisoned the princess, and sent
out a party in search of Impa.
Braving forests and mountains, Impa fled for her life from her
pursuers. As she reached the very limit of her energy she found
herself surrounded by Ganon's evil henchmen. Cornered! What could
she do? ... But wait!
All was not lost. A youth appeared and skillfully drove off
Ganon's henchmen, saving Impa from a fate worse than death.
This youth had come to Hyrule from far, far away and thus came across Impa and
Ganon's henchmen. Impa recounted the whole story of the princess Zelda
and the evil Ganon. Burning with a sense of justice, the young one resolved to
save Zelda, but Ganon was a powerful opponent. He held the Triforce of
Power. And so, in order to fight off Ganon, the
scattered eight fragments of the Triforce of Wisdom had to be brought together to
rebuild the mystical Triangle.
If this couldn't be done, there would be no chance for the youth to fight all the
way into Death Mountain where Gannon lived. Can this traveler really destroy
Ganon and save the Princess Zelda? Only your skill can answer that
question. Good luck. Use the Triforce wisely.
Similarly to what happened with Mario All Stars, the controls remained similar to the ones of the
NES game. Of course the SNES controller has more buttons than the NES one and the game took
advantage of this.
Therefore:
Digital Pad: Moves the hero in all four directions (not diagonals). Also moves the cursor in the subscreen.
A and Y buttons: Use your sword (input letters in Dreamer Nom's patch).
B button: Uses the chosen item.
Start and X buttons: The Start button starts the game and confirms decisions. Both buttons switch between main and subscreen.
L and R buttons: Cycles through your items.
Select button: Selects game files and shows everything you should achieve during the current week.
1, You can bomb a wall or burn a tree in almost every screen. With a few
exceptions, each overworld screen has no more than one entrance to
caves/dungeons.
2, The Boomerang is your friend. Especially against Like Likes.
3, Get used to facing projectiles and block them with the shield. It helps.
But be sure you have the proper shield.
4, Clear dungeon rooms of all enemies, sometimes an item may appear when
the are gone. Also you will only be allowed to puch blocks that trigger
secrets after dispathing them.
5, Some very tough enemies can be taken down swiftly with bombs. But you
had better keep a few for strict necessisties.
6, If the enemy doesn't flash when hit, you may need to use another weapon
or approach.
7, The Blue Ring is a life saver. try to find and buy it as soon as you can
(but boy, it's really expensive!).
8, If you think you are missing something, hit the select button to see
what you can get in the current week.
9, If you clear a screen with tough enemies, try to do everything you need
past that screen right away, so that you don't have to return there again,
because enemies respawn immediately in this game.
10, Remember where you find bombs laying on the ground. There are places
when you can get them whenever you drop by.
11, You don't need to buy any keys. Do it only if you get hopelessly
stuck.
12, Flute Magic: If you play the flute while facing up or right you'll be
brought one level forward, down or left will take you backwards.
13, The Magic Wand is pretty strong in this game. Rely on it if you don't
have the Magic Sword or can't shoot with it.
14, Buying the Blue Medicine twice gives you a Red Medicine. Normally this
would cost more than a direct purchase, but if you can find someone that
sells only Blue Medicine at very cheap prices...
15, You can hit the gravestone in E6, the tree in D4 or the stone in B5 (see
the map at the start of the walkthrough) with the boomerang to make a fairy
appear every time.
A, Emulator
The best emulators to play this game are ZSNES and SNES9X (but only the patched game).
Nlke will also work, and with an unpatched rom will make you play as the girl.
In any case, most of this section was written with ZSNES in mind.
B, FAQ
1, Q: How do I insert action replay codes in ZSNES? - A: Simply click "cheat" in the Zsnes menu and insert the code.
2, Q: Why am I not able to see the clues the old men normally give you? - A: You'll have to change the video mode at config/video in the Zsnes gui. Try which mode works on your computer. Or try hitting "2" on the keyboard in ZSNES.
3, Q: You said there's sound in the game now, but I can't hear anything! Why? - A: Enable the sound in Zsnes gui config/sound (default is off).
C, Cheating by emulation
1, A not really dishonorable cheat would be to accelerate the time rather than waiting, in situations where you don't have a choice (such as working all the way to level6 before the entrance can be accessed). In ZSNES you can do this by pressing the keys "~" or "§".
2, You can't pause the timer by just pressing start. If you wish to do that, you have to pause emulation (just press esc in ZSNES).
3, On the other hand, a rather dishonorable cheat would be using Save States to win the Money Making Game (well save states can be abused in many other ways, but this one stands out for this game).
D, Glitches
1, Ganon can be fought with only 6 Triforce parts (or none with hacked save states). There's no need to get through Level 7 and 8 - just wait until it is 3:45... but don't forget the Silver Arrow... cheater :p
2, The game doesn't save the subscreen maps of dungeons that are made as you walk through them.
3, Red dots marking dungeons on the world map appear too early.
4, Use a PAR code for the red medcine BEFORE you have taken the letter and you will never run out!
This is a reasonably straightforward walkthrough from the beginning to the end of the game.

Week 1: Overworld (between Start - Level 1)
Map: Detailed Overworld Map
Item: Wooden Sword - 

Enter the cave. Grab the collect the Wooden Sword (F1) and then leave. Head north two
screens, west one screen, then cross the bridge north one screen and enter the dungeon (E4).

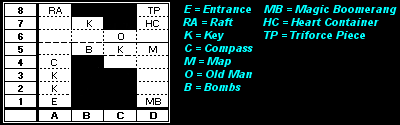
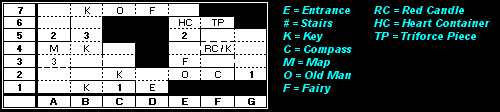
Level 1
Map: Detailed Level 1 Map
Item: Bow - 
Boss: Aquamentus - 

Head north. Kill all the snakes for a  Key (D2). Use it on the door and continue north. Grab the
  Compass (D3). Head north and grab the
  Map (D4). Kill the bats to open the door, then head west. Key (C4). Head north and grab another Key (C5).
Watch out for Wall Masters in this room, they'll hurt you and dump you back at the entrance. Head west. Kill the Stalfos (one holds a Key (B5)). Head north. Kill the Goriya and grab yet another Key (B6).
Head west and grab the
Map (D4). Kill the bats to open the door, then head west. Key (C4). Head north and grab another Key (C5).
Watch out for Wall Masters in this room, they'll hurt you and dump you back at the entrance. Head west. Kill the Stalfos (one holds a Key (B5)). Head north. Kill the Goriya and grab yet another Key (B6).
Head west and grab the  Bombs (they'll vanish if you wait too long). Head north. Kill the Stalfos (one holds a Key (A7))
and return south (if you go north, there's only the Old Man with the tip "Arrows cost money to use" (A8)). Head south five times until you reach a room with
spikes . Push the left-hand corner of the diamond down and go down the
stairs. Grab the Bow (A1) and return. Now work your way back to (C5).
Bombs (they'll vanish if you wait too long). Head north. Kill the Stalfos (one holds a Key (A7))
and return south (if you go north, there's only the Old Man with the tip "Arrows cost money to use" (A8)). Head south five times until you reach a room with
spikes . Push the left-hand corner of the diamond down and go down the
stairs. Grab the Bow (A1) and return. Now work your way back to (C5).
 Heart Container (D7) and head north. Grab the
  Triforce piece (D8) and you're done.
Overworld (between Level 1 - 2)
Item: Wooden Arrow -  , Heart Container - , Letter -
Head south, east, south, west, and enter the cave . The Wooden Arrow (E2)
should now be for sale. Buy it. The bow can now be used. Instead of an
arrow counter, the bow uses Rupees. Despite the cost involved, it's a
powerful weapon. It can kill many enemies in one hit, including the
previously undefeatable Zoras, and deals great damage against certain
bosses. Heart Container (H1). Head east, east, south, east and get it at the beach. (This Heart Container is only available between 0:20 and 0:28! Letter (H3) Go north (ignore the Heart Container, you can't reach it yet), north and west and bomb the right side of the one rock to enter Dungeon 2 (G5).

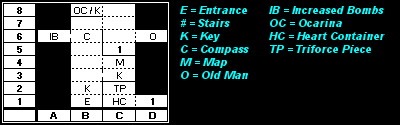
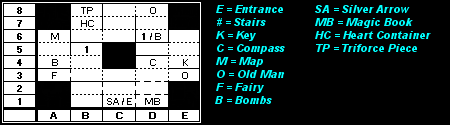
Level 2
Map: Detailed Level 2 Map
Item: Wooden Boomerang - 
Boss: Dodongo - 
Head north and kill the Goriya. When they are all dead the Wooden Boomerang (A2) will appear. Grab it. Head north and grab the Compass (A3) . Continue north. Kill the Stalfos (one drops a Key (A4)) and head north through the locked door. Kill the Gels, grab the Map (A5), and head east. Bombs
and continue south for three screens . Push the left-hand corner of the
diamond down and go down the stairs (B1). Kill the snakes, go up to listen an old man saying "Dodongo dislikes smoke" (A8), then down again and bomb the
eastern face. Head through to fight the boss, Dodongo. Heart Container (B7) and head north. Grab the Triforce piece (B8) and you're done.
If you play with the restoration patch you should have a little time left, so you can buy the bow, search for secrets and so on
Week 2: Overworld (between Level 2 - 3)
Item: Blue Candle -  , Magic Shield -
  , Blue Ring -
  , Heart Container -
The timer will now be set to 1:00 (Roto's patch, f you use the Restore pacth you must wait until 0:57 and are skiped to 1:07) that means that you are in week 2 now, that means the bombs in the shop are replaced with the Blue
Candle. Get it by going back to the Shop (E2) and enter the cave.
Primarily, you really need to get the Blue Candle (60 rupees). You could get the Magic Shield (130 rupees), too but don't if you are not into rupee stocking because you'll soon wish to have at least 250 (and the shield can be found at a cheaper price after level4).
If you don't have enough money then you can spend a lot of time slaughtering enemies or you can go (from the shop) one screen left, up and up on the little island (D4). Burn with the candle the top right bush to reveal a moblin who offers 100 rupees. Go down and right (E3)and burn the 4th bush from the right to reveal another Moblin that offers 100 rupees. You can also bomb the center wall one screen down from the shop to play the Rupee Game (E1), which can get you tons of money quick. For more, see this guide's section about secret caves.
If you manage to save 250 rupees or more, you'll be able to buy the Blue Ring soon.
Heart Container (B3).
Take the Heart Container, you'll need every last one you can get. If you do have 250 rupees, go up and enter the cave for the Blue Ring (B4) which halves damage dealt to you.

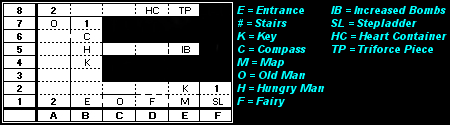
Level 3
Map: Detailed Level 3 Map
Item: Raft -  , Magic Boomerang -
Boss: Manhandla - 
Head north and grab the Key (A2), then go north and kill the giant bats for another Key (A3). Head north and grab the Compass (A4).
Head north and bomb the north face. Head north. Kill the Goriya and push the left-hand block aside to open the door. Go north, kill the
Darknuts and push the left-hand corner of the diamond aside. Go down the stairs to claim the Raft (A8). Go back upstairs and head south twice, then east once. Head north and kill the Darknuts for a Key (B7).
Now go back one screen down and bomb the south wall. In the next room you'll find some Bombs (B5). 2 screens to the right is the Map (D5). Head down, left and bomb up for a Key (C5). Then back down and right and continue down 3 screens. Kill the blue Goriya to get the Magic Bommerang (D1). Now head back to the screen where you bombed the southern wall (4 screens up, 2 screens left and one screen up. Unlock the door to the right to hear an old man saying "I hear growling coming from the next room", means bomb the east face. Head north to fight the boss, Manhandla. Heart Container and head north for the Triforce piece.
Overworld (between Level 3 - 4)
Item: White Sword -  , Meat -
Now wait until the timer hits 1:45. At this time the Tornadoes, which are blocking the way to the White Sword disappear. If you don't want to wait because you are too early then enter Dungeon 4 now and get this sword after this Dungeon (then not only the Tornadoes but also the Lost Woods are vanished. This part is better to play with the restoration patch, because the week is not over directly after D4. To get the White Sword (be sure to have 5 Heart Containers) go to the shop where you bought the Blue Ring (B4). From the shop head down twice. The Lost Woods's magic is gone. Go left and up twice (also the Tornadoes are gone). Take the left stairs and go up, you will enter the graveyard (A5). In the middle row, second headstone from the left, push it down to reveal a passage. Go in and collect the White Sword, which is much stronger than your old one.
Meat, go one screen right and step onto the wooden platform to reach Dungeon 4 (C5).

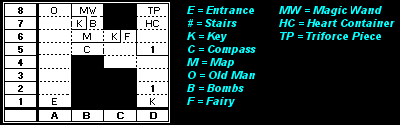
Level 4
Map: Detailed Level 4 Map
Item: Ocarina -  , Increased Total of Bombs -
Boss: Digdogger - 
Head north. Use the Candle the light the room, then kill all the Gels for a Key (B2), then head north and bomb the eastern face and go through to find a Key (C3), then return left and up once. Head east for the Map (C4) and then west again and go north. This room contains a worm miniboss. Simply shoot it from far with arrows or sword beams. After you kill it
another appears. Kill the second one then unlock the door and head
north. Grab the Compass (B6). Bomb the left wall and buy Increased Bombs for 50 rupees (A6).
Return east, head north, east, north and ignore the enemies. Head west. Kill the Darknuts for a Key and push the left-hand corner of the diamond aside to enter the basement. Grab the Ocarina (B8) and go back upstairs.
Head west, kill the enemies, then head south. Light the room, unlock
the door and head south. Go through the right door for an old man saying "There are beings weak to sound" (D6). Return west, head south again, through the basement, and
into the next room. In here the mouse-like creatures can be destroyed
by playing the Ocarina. Head west to fight the boss. First play the
Ocarina. This makes the boss break up into smaller eye things. These
eyes are weak to bombs, which are easier to kill them with than sword
beams or slashes. When they're all dead grab the Heart Container (C1), then head north and grab the Triforce piece (C2). If you play with the restoration patch you will now have time to look for the White Sword which is easy to get after 1:45.

 Medicine cheap. Buy the blue twice to get a red one and then into Dungeon 5 (H8).

 , Increased Total of Bombs -

 Map (E1) and push the middle block to open the door north (be carefull that the Wall Masters won't catch you).
In the next room kill the Keese and grab the Key (E2). Now head west three times, and north 3 times (ignore the key right now). In this room is a man saying "My stomach grumbles" (B5) - Give him the meat and then continue 2 screens to the right, fight the Dodongos and bomb afterwards the right wall to receive Increased Bombs for 50 rupees. Make your way back to the screen where the hungry man was (B5) and go north.
Push the block aside to get the Compass (B6).
Bomb the western face to proceed. You can't do anything in this room
just yet, so head back east, push the block and go then north. Kill the Darknuts and push the
left-hand block aside to reveal the stairs. Go through the basement and
back up the other ladder.
In this next area, head south and down the stairs. Grab the Stepladder (F1).
Head back upstairs, north, through the basement, and finally south to
reach the room where you got the Compass earlier (B6). Push the block down
and head west, then go back and push the block again to head south two
screens. Walk over the water using the Ladder and grab the Key (B4).
Head back north two screens and go west. Light the room and have a look
around you. You need to make your way to the locked door using the
Ladder. The Ladder can only cross one tile of water at a time. Take a look north to meet an old man saying "The next Level is at the beach" (A7). Then go down six times using
the Candle to light your way.
Kill the Darknuts and push the block to enter the basement. In the next room kill the mummies and head east, then east again. Light the room and kill the mummies, then push the center block of the horse shoe-shaped barrier to the left and continue east to fight the boss.
This boss is a fly-like insect, surrounded by six smaller versions.
Kill all the smaller flies then focus on the boss itself. Grab the Heart Container (D8), then head east and collect the Triforce piece (E8).
Heart Container (C6).
Heart Container (A1)
Heart Container (H4).
Now go down, left, down and right over the bridge. If it's 2:35 or later you should see a stone panel with an ocarina symbol on it. Stand on the tile and play the ocarina. The dungeon entrance will appear. Head on into Dungeon 6 (note: you'll need a wooden arrow to pass this dungeon)(H2).


 Key (B7). Return west and head south. Defeat the enemies again, but this time push the left-hand block to open the eastern door.
Play the Ocarina to kill the Pols Voices and grab the Map (B6). Head east and grab the Key, then return one screen west again. Head north. Grab the Bombs (B7) and then walk north through the face into the secret room. Head down the stairs and grab the Magic Wand (B8). This weapon shoots magic beams like those of the Wizzrobes, can be used
when skulls have disabled your sword, and doesn't require you to have
full health.
Head back upstairs and go south, south, west, south, and east. Play the Ocarina to kill the Pols Voices, then grab the Compass (B5)
and bomb the eastern face. Kill the miniboss here for four blue Rupees,
then head south (or north if you need healing). Grab the eight blue
Rupees and head east. Play the Ocarina to kill the Pols Voices, then
make your way 3 screens south, grab the Key (D1), return one screen north and through the basement. Unlock the
door and head north. Play the Ocarina to kill the Pols Voices, then
continue north to fight Ghoma.
Ghoma moves around like a crab while shooting fireballs. Simply
change to your Bow and shoot its eye when open to kill it. Collect the Heart Container (D7) and Triforce piece (D8) and you can leave the dungeon.
 Power Bracelet (B7)!
This allows you to move the small boulders on the overworld. Grab the
Power Bracelet and head east. Push the rock aside and head north, east,
east, east, east, east, south, west, and enter Dungeon 7.
Power Bracelet (B7)!
This allows you to move the small boulders on the overworld. Grab the
Power Bracelet and head east. Push the rock aside and head north, east,
east, east, east, east, south, west, and enter Dungeon 7.


 Compass (F2). Now go west 3 screens and kill the mummies for a Key (C2).
Head again west 2 times, down, and east.
Compass (F2). Now go west 3 screens and kill the mummies for a Key (C2).
Head again west 2 times, down, and east.
Grab the Key (B1), and go east again. In this room go through the basement. Head up and bomb the left wall and go into this room. Make your way through these secret rooms with rupees and a fairy left, up and bomb the right wall and continue east. Grab the Key (F4), continue east, move the block, go north and kill the Blue Darknuts. Head west and bomb the south wall. Go into the basement and get the Red Candle (F4).
The Red Candle can be used any number of times on a screen (although
only three flames can be burning at one time). Now head back to the
entrance (either manually or else by dying).
From the entrance, head north and then west three screens. Bomb the north face go in the opened room and head north. Grab the Map (A4), kill the Darknuts and head east. Grab the Key (B2) and head south. Bomb the eastern face for eight blue Rupees. Head north
for another eight. Head back to the room where you got the Key (south, west, north); this
time, head north. Kill the mummies and push the left-hand block aside
to open the shutter doors. Do not take the staircase, they are a one-way street back
Head north then north again. Grab the Key (B7). To the right is an old man saying "The Triforce has to be complete to fight Ganon", a fairy and a dead end.
Go west from the room with the key through the locked door. Head south twice and fight Manhandla. The Wand
should make short work of it. Push the left-hand block aside and go
down the stairs. Head north and fight Aquamentus. After two shots of
the Wand he changes to a blue color and it no longer affects him. After
this he goes red and shoots more fireballs than before. When he's dead
collect the Heart Container (E6) and Triforce piece (F6)and you're done.
 , Magic Sword -
  Red Ring (B1) is below the left Amos. After
this (use the flute to) go to the entrance Level 2 (G5), use the raft to get up, then continue left twice. Take the stairs at the waterfall up and go into the cave and you'll get the Magic Sword (E7) (for this sword you won't need a special number of Heart Containers because it is Time Related).
From the place you've found the Power Bracelet (B7) go right, up and left (or you can use the flute to reach Level 7 and
go all the way left) and see something which may look familiar to Zelda fans. It's Spectacle Rock, and also the entrance to Level 8 (B8). You just have to bomb
the left rock.
Red Ring (B1) is below the left Amos. After
this (use the flute to) go to the entrance Level 2 (G5), use the raft to get up, then continue left twice. Take the stairs at the waterfall up and go into the cave and you'll get the Magic Sword (E7) (for this sword you won't need a special number of Heart Containers because it is Time Related).
From the place you've found the Power Bracelet (B7) go right, up and left (or you can use the flute to reach Level 7 and
go all the way left) and see something which may look familiar to Zelda fans. It's Spectacle Rock, and also the entrance to Level 8 (B8). You just have to bomb
the left rock.

 , Silver Arrows -

 Silver Arrow (C1).
Bomb the eastern face. In there you'll find eight blue Rupees as well as the Magic Book (D1).
This upgrades your Wand so that its blasts turn into flames when they
hit something. Now bomb the northern face. If you go left and bomb left you'll find only a dead end, so continue by bombing the north wall again. Use
bombs to defeat the Dodongo. Unlock the door to the east for an old man saying "Use the sword to stop Ganon then shoot an arrow" (E3). Then go back east, north and collect the Compass (D4)
(there are invisible barriers in this room, so move around until you
can get to it). One screen to the right is a Key (E4). There's nothing more this way but dead ends, so go back west, south, west, west. If you need healing bomb the west wall for a fairy, otherwise go north. Head west (collect the bombs with the boomerang), north and move the 4th diagonal block from the right. Continue north and collect the Map (A6). Now make your way back south, south, east and go north. Kill Patra and push the block aside and enter the basement. Collect the bombs and head north, and then north to meet an old man saying "The ones next door can show you to the arrow" (D8). Continue west, dodge the Wall Masters and head
south. Here you fight three Dodongos. Afterwards head south to fight Aquamentus. This is the same upgraded version as seen in Dungeon 7. Head west to fight Blue Manhandla. This one is double strong than the common green one and shoot many fireballs. Defeat him quickly, because his heads will regenerate after a little while. Head north to fight two Ghomas, which is no problem with the silver arrow. Collect the Heart Container (B7) and Triforce piece (B8) and you're done!
Overworld (between Level 8 - Final Area)
Silver Arrow (C1).
Bomb the eastern face. In there you'll find eight blue Rupees as well as the Magic Book (D1).
This upgrades your Wand so that its blasts turn into flames when they
hit something. Now bomb the northern face. If you go left and bomb left you'll find only a dead end, so continue by bombing the north wall again. Use
bombs to defeat the Dodongo. Unlock the door to the east for an old man saying "Use the sword to stop Ganon then shoot an arrow" (E3). Then go back east, north and collect the Compass (D4)
(there are invisible barriers in this room, so move around until you
can get to it). One screen to the right is a Key (E4). There's nothing more this way but dead ends, so go back west, south, west, west. If you need healing bomb the west wall for a fairy, otherwise go north. Head west (collect the bombs with the boomerang), north and move the 4th diagonal block from the right. Continue north and collect the Map (A6). Now make your way back south, south, east and go north. Kill Patra and push the block aside and enter the basement. Collect the bombs and head north, and then north to meet an old man saying "The ones next door can show you to the arrow" (D8). Continue west, dodge the Wall Masters and head
south. Here you fight three Dodongos. Afterwards head south to fight Aquamentus. This is the same upgraded version as seen in Dungeon 7. Head west to fight Blue Manhandla. This one is double strong than the common green one and shoot many fireballs. Defeat him quickly, because his heads will regenerate after a little while. Head north to fight two Ghomas, which is no problem with the silver arrow. Collect the Heart Container (B7) and Triforce piece (B8) and you're done!
Overworld (between Level 8 - Final Area)


Ganon's behavior is much like in the original Legend of Zelda, NES. He will slide around the room, invisible, at various angles. At the end
of each line of movement he becomes visible, laughs, and takes off on
another invisible journey. He follows a clear pattern. If you can
intercept him (randomly slashing everywhere will eventually work, too)
he'll become blue and visible and be stunned for a bit. Shoot him with
a single Silver Arrow and it's all over. Pick up the Triforce of Power (A3) and continue north. Slash at the flames to free Zelda, then talk to her. Congratulations, you've finished the game!
VI, Secrets VII, Time Related Events VIII, Cheat IX, Items X, Bestiary XI, Other Sprites XII, Fourth Quest XIII, Conclusion
A, Heart Containers -
1, (H1) - At 00:20 - 00:27 go to the beach
2, (B3) - Burn the left tree to find a cave with an Old Man and decide between a Heart Container or a Red Medicine
3, (H4) - Use the stepladder to get this Heart Container
4, (A1) - Use stepladder to reach a cave with an Old Man and decide between a Heart Container or a Red Medicine
5, (C6) - Bomb the wall to find a cave with an Old Man and decide between a Heart Container or a Red Medicine
6 - 13, You'll get also one Heart Container for every defeated Dungeon Boss - eight at all!
B, Medicine Shop -
1, (D5) - Bomb the wall to find a cave with an Old Woman offering Blue (40) and Red (68 rupees) Medicine
2, (A8) - Go into the open cave to find an Old Woman offering Blue (40) and Red (68 rupees) Medicine
3, (H8) - A Street Vendor sells Blue Medicine for 10 rupees before Level 5 from between the time 2:10 - 2:33
4, (B3) - Burn the left tree to find a cave with an Old Man and decide between a Heart Container or a Red Medicine
5, (A1) - Use stepladder to reach the cave with an Old Man and decide between a Heart Container or a Red Medicine
6, (C6) - Bomb the wall to find a cave with an Old Man and decide between a Heart Container or a Red Medicine
C, Fairies - 
1, (G4) - Fairy Pond
2, (C4) - Hit the tree yith your Boomerang - for every hit appears a Fairy
3, (E6) - Hit the gravestone yith your Boomerang - for every hit appears a Fairy
D, Rupees Gaming Places - 
1, (E1) - Bomb the wall (best place only one sceen left from start)
2, (F6) - Burn the tree
E, Free Rupees - 
1, (C1) - Bomb the upper wall on the right side: 9 x 5 = 45 Rupees
2, (E3) - Burn the 4th tree from left: a Moblin offers 100 Rupees
3, (D4) - Burn the tree in the corner: a Moblin offers 100 Rupees
4, (C3) - Burn the left tree: a Moblin offers 100 Rupees
5, (G4) - Bomb the center of the wall in the fairy pond: 9 x 5 = 45 Rupees
6, (E4) - Bomb the upper wall on the right side at Dungeon 1 entrance: 9 x 5 = 45 Rupees
7, (E6) - Bomb the upper wall: 9 x 5 = 45 Rupees
8, (G7) - Bomb the upper wall on the right side: 9 x 5 = 45 Rupees
9, (A6) - Bomb the left of the wall: 9 x 5 = 45 Rupees
10, (D7) - Move the leftmost block of a circle with the Power Bracelet: a Moblin offers 30 Rupees
11, (F8) - Bomb the upper wall on the right side: 9 x 5 = 45 Rupees
F, Pay Repair Charges - 
1, (D6) - Bomb the center of the wall: costs 20 Rupees
2, (C8) - Bomb the center of the wall: costs 20 Rupees
3, (D8) - Bomb the center of the wall: costs 20 Rupees
G, Shops -
1, (E2) - (1st week) Open Cave: Magic Shield (130 Rupees), Bombs (20 Rupees), Wooden Arrow (80 Rupees)
2, (E2) - (2nd to 4th week) Open Cave: Magic Shield (130 Rupees), Dungeon Key (100 Rupees), Blue Candle (60 Rupees)
3, (G3) - (1st week) Bomb the center of the wall: Magic Shield (130 Rupees), Bombs (20 Rupees), Wooden Arrow (80 Rupees)
4, (G3) - (2nd to 4th week) Bomb the center of the wall: Magic Shield (130 Rupees), Dungeon Key (100 Rupees), Blue Candle (60 Rupees)
5, (B4) - Open cave: Wooden Arrow (80 Rupees), Blue Ring (250 Rupees), Food (60 Rupees)
6, (G8) - Open cave: Magic Shield (90 Rupees), Dungeon Key (80 Rupees), Food (60 Rupees)
7, (E8) - Bomb the center of the wall: Magic Shield (90 Rupees), Dungeon Key (80 Rupees), Food (60 Rupees)
H, Increased Bomb capacity -
1, (A6) - Level 4: Bomb left; pay the Old Man 50 Rupees to carry 4 more Bombs
2, (E5) - Level 5: From the beginning go straight up, at the hungry man two screens left, and bomb the left wall - pay 50 Rupees to carry 4 more Bombs
I, Old Men Advices - 
1, (D1) - Bomb the center of the wall: "Have you found the dungeon in the One Rock?"
2, (A1) - (2nd week) Burn the left tree at the bottom: "Go north, west, south, west in the Lost Woods!"
3, (A1) - (3rd week) Burn the left tree at the bottom: "Beyond the Woods lies a graveyard."
4, (A4) - Bomb the right wall: "There's a secret in the graveyard."
5, (H6) - Open Cave: "Climb the cliff behind the grave soldiers guard!"
6, (B6) - (Before 3:08) Open cave: "Luckily the Armos still sleep."
7, (B6) - (After 3:08) Open cave: "Life was blown into Armos."
8, (B5) - (Before Dungeon 6) Open cave; Pay 10 Rupees: "The Magic Rod is in a secret cellar of Level 6."
9, (B5) - (Before Dungeon 7) Open cave; Pay 10 Rupees: "The red candle is in a secret cellar of Level 7."
10, (B5) - (Before Dungeon 8) Open cave; Pay 10 Rupees: "The Book of Magic is in a secret room in Level 8."
11, (B5) - (Before Dungeon 8) Open cave; Pay 10 Rupees: "For the Silver Arrow push a block in Level 8."
12, (B5) - (Before Dungeon 8) Open cave; Pay 10 Rupees: "My last advice, use a boomerang if out of reach."
J, Items -
1, (F1) - Open Cave: An Old Man offers the Wooden Sword
2, (H3) - Open Cave: An Old Man offers the Letter
3, (A5) - Push down the 2nd gravestone from the left in the middle row: An Old man offers the White Sword if you have 5 Heart Containers
4, (B7) - Touch the 2nd Armos from the left in the top row to find the Power Bracelet
5, (B1) - Between 3:25 - 3:34 touch the left Armos to find a cave with an Old Man who offers the Red Ring
6, (E7) - Open Cave: An Old Man offers the Magic Sword between 3:25 - 3:34
K, Warp Points - 
1, (H1) - Move the leftmost block in a circle with your Power Bracelet and take the cave - you'll reappear at (C7)
2, (C7) - Move the leftmost block in a circle with your Power Bracelet and take the cave - you'll reappear at (H1)
L, Dungeon Entrances - 
1, (E4) - Walk across the bridge
2, (G5) - Bomb the large "One Rock"
3, (C1) - Walk through the woods
4, (C5) - Use your raft
5, (H8) - There's an invisible secret passageway...
6, (H2) - Play the flute on the stone panel
7, (F7) - Just go in
8, (B8) - Bomb the left rock
9, (F1) - At the time 3:45 you are able to defeat Ganon
The game is divided in 4 cycles (weeks): the 1st is from 0:00 to 1:00, the second is from 1:00 to
2:00, the 3rd is from 2:00 to 3:00 and the 4th is from 3:00 to 3:56.
However, the only way to pass at the next one is gaining the required pieces of the Triforce,
otherwise the events (if the game is patched properly) will repeat even though the clock moves
on (in other words, if you don't take the second piece of Triforce within the first hour, you'll
get the ever-shooting sword again at 1:10, just as you did at 0:10) and all permanent events
triggered during the week (such as the appearance of Level6's tile or the Armos having woken up)
will be reverted to the original condition that they had at the week's start.
In the parenthesis after the effects is that time shown in hex values:
1, Week 1
0:10 The sword shoots even if your hearts are not all filled (0A)
0:15 The sword shoots no longer if your hearts are not all filled (0F)
0:18 A Thunder kills all enemies on the screen (12)
0:20 A Heart Container is available in front of level 6 (14)
0:28 The Heart Container can't be collected anymore (1C)
0:30 Fairy Pond empty (1E)
0:33 A Fairy appears in the middle of the screen (21)
0:35 All enemies give Fairies or Blue Rupies (23)
0:38 A Thunder kills all enemies on the screen (26)
0:40 Fairy again in Pond. No more guaranteed Fairies and Blue Rupies (28)
0:43 Magic Clock stops all enemies on screen (2B)
0:45 Unlimited Bombs (2D)
0:53 No more Unlimited Bombs (35)
0:56 The game may freeze if not patched (38)
Note The game jumps to 1:00 when you get the second Piece of the Triforce
2, Week 2
1:00 It is possible to purchase a Blue Candle (00)
1:09 Increased likelihood to gain many rupees by defeating monsters (09)
1:12 A Fairy appears in the middle of the screen (0C)
1:13 No more increased likelihood to gain many rupees (0D)
1:19 A Thunder kills all enemies on the screen (13)
1:20 Prices halved in shops (14)
1:25 Magic Clock stops all enemies on screen (19)
1:28 Prices return to normal (1C)
1:30 You get the Red Candle that shoots up to 2 flames at a time (1E)
1:33 A Thunder kills all enemies on the screen (21)
1:35 A Fairy appears in the middle of the screen (23)
1:38 No more Red Candle (26)
1:40 The Lost Woods' magic disappears (28)
1:45 The Tornadoes disappear. Go for the White Sword (2D)
1:47 Magic Clocks stops all enemies on screen (2F)
1:50 a whistle is heard upon entering overworld screens with a secret (32)
1:56 The game may freeze if not patched (38)
Note The game jumps to 2:00 when you get the third piece of the Triforce
3, Week 3
2:00 The Whirlpool that blocks Level 5 disappears; the Lost Woods are not more lost and the Whirlwinds before the graveyard calm down (00)
2:10 A Street Vendor sells Blue Medicine for 10 rupees before Level 5 (0A)
2:14 A Thunder kills all enemies on the screen (0E)
2:20 Unlimited Bombs (14)
2:25 A Thunder kills all enemies on the screen (19)
2:27 Magic Clocks stops all enemies on the screen (1B)
2:28 No more Unlimited Bombs (1C)
2:30 The falling rocks stop coming (1E)
2:32 You have all Heart Containers (20)
2:34 The Street Vendor leaves (22)
2:35 The Tile that opens Level 6 appears (23)
2:37 A Fairy appears in the middle of the screen (25)
2:39 Another Fairy appears in the middle of the screen (27)
2:42 The Heart Containers you got at 2:32 are gone (2A)
2:45 You get the Mighty Boomerang (2D)
2:48 Magic Clocks stops all enemies on the screen (30)
2:50 First sunset (darknuts in Overworld, decreased amount of monsters in Dungeons), the falling rocks come back (32)
2:55 No more Mighty Boomerang (37)
2:56 The game may freeze if not patched (38)
Note The game jumps to 3:00 when you get the sixth Piece of the Triforce
4, Week 4
3:08 Dawn, the Armos wakes up (08)
3:10 Shop prices halved (0A)
3:15 All Red Bubbles are turned into harmless Blue Bubbles (0F)
3:19 A Thunder kills all enemies on the screen (13)
3:20 Shop prices back to normal(14)
3:21 A Thunder kills all enemies on the screen (15)
3:25 The Red Ring and Magic Sword are now available (19)
3:30 Blue Bubbles are turned back to Red Bubbles again (1E)
3:35 Red Ring and Magic Sword gone; a whistle is heard upon entering overworld screens with a secret (23)
3:40 The sword shoots even with hearts not filled, Unlimited Bombs and Mighty Boomerang (28)
3:45 Second sunset (darknuts in Overworld, decreased amount of monsters in Dungeons), Ganon is ready for the final battle (2D)
3:56 The game may freeze if not patched (38)
4:00 You lose all the powers gained at 3:40. The Armos fall asleep (for 8 minutes). Ganon no longer appears (00)
A, Pro Action Replay Codes
1, Swords
7E743A01 - Wooden Sword
7E743A02 - White Sword
7E743A03 - Magic Sword
2, Shields
7E743B00 - Regular Shield
7E743B01 - Magical Shield (this code only works if you start the game with it active, or if you turn the code on while playing an existing game, die, save, and then continue)
3, B Button Items
7E742101 - Wooden Boomerang
7E742102 - Magic Boomerang
7E742263 - Infinite Bombs x99
7E743C01 - Bow
7E742301 - Wooden Arrow
7E742302 - Silver Arrow
7E742401 - Blue Candle
7E742402 - Red Candle
7E742601 - Meat Bait
7E742501 - Ocarina
7E742F01 - Letter
7E742701 - Blue Medicine
7E742702 - Red Medicine
7E742801 - Magic Wand
3, Quest Items
7E742C01 - Stepladder
7E742901 - Raft
7E742E01 - Power Bracelet
7E742B00 - No Ring
7E742B01 - Blue Ring
7E742B02 - Red Ring
7E742A01 - Magic Book
4, Heart Containers
7E6DDD18 - x3 Heart containers
7E6DDD20 - x4 Heart containers
7E6DDD28 - x5 Heart containers
7E6DDD30 - x6 Heart containers
7E6DDD38 - x7 Heart containers
7E6DDD40 - x8 Heart containers
7E6DDD48 - x9 Heart containers
7E6DDD50 - x10 Heart containers
7E6DDD58 - x11 Heart containers
7E6DDD60 - x12 Heart containers
7E6DDD68 - x13 Heart containers
7E6DDD70 - x14 Heart containers
7E6DDD78 - x15 Heart containers
7E6DDD80 - x16 Heart containers
(be sure to switch those codes off before you collect a new HC or it will be lost. To make the cheated HC permanent (without code) you'll have to die, safe and restart)
5, Health Modifiers
7E6DDC80 - x8 Infinite Heart containers (use it combined with the above 7E6DDD80 code to get x16 Infinite Heart Containers)
7E0652FF - Invulnerability
6, Bomb Bags
7E74DC04 - Bomb Bag x4
7E74DC08 - Bomb Bag x8
7E74DC0C - Bomb Bag x12
7E74DC10 - Bomb Bag x16
7E74DC63 - Bomb Bag x99
7, Dungeon Items
7E7430FF - Have all Compasses
7E7432FF - Have all Maps
7E7439FF - Have all Triforce Pieces
7E743809 - Infinitive Keys x 9 (you have to run against a locked door before you see the effect of this cheat)
7E743863 - Infinitive Keys x 99
8, Rupees
7E743723 - 9000 Rupees (almost)
7E7436FF -AND- 7E743700 - Infinite Rupees X255
7E74360F -AND- 7E743727 - Infinite Rupees X9999
7E7419xx - Every monster is killed and leaves (replace xx with 01) several stuff or (replace xx with FF) a Blue Rupee
9, Time Related Items
7E074601 - use this code if you use any cheat for time related items. This code prevents the item from reseting
7E7421FF - Mighty Boomerang as item (this boomerang isn't useable until you insert the below code, but isn't necessary to make the below code work)
7E74BDC0 - Mighty Boomerang
7E74BB80 - Always shooting sword
7E74BB08 - Unlimited bombs
B, Time Change
It might get important to change the time, especially if you've missed or want to replay a Time
Related Event or if time's running out. If you want to activate a particular time related event
you have 2 ways to do so:
1, PAR-Code:
7FFFFFxx - Minute changing: replace xx with the minute time
in HEX you want - look above to "Time related Events". You will find the specific time in HEX in
the clambs at the end of the sentence of each time related event.
7E7439C0 - Week (hour) changing for Week 2 (2 Triforce Pieces)
7E7439F0 - Week (hour) changing for Week 3 (4 Triforce Pieces)
7E7439FC - Week (hour) changing for Week 4 (6 Triforce Pieces)
A cheat back to Week 1 is still missing (e.g. if you've forgotten the time
related Heart Container).
If you play with the Restoration patch, use
7FFFF901 - Week (hour) changing for Week 2
7FFFF902 - Week (hour) changing for Week 3
7FFFF903 - Week (hour) changing for Week 4
2, HEX-Editor: Open with a Hex-editor
(AXE v2.0) the Zsnes savegamestate (*.zst), click on "Navigate" and "Goto". After this insert
one of the following adresses:
Minute changing: Adress - 00020C12 insert the minute time you want to have in HEX.
Hour changing: Adress - 00020C0C insert the hour time you want
to have in HEX (00-FF). (since the week isn't changed, there is really no use for this)
A, Attack Items
Wooden Sword -
Location: (F1) - Open Cave: An Old Man offers the Wooden Sword.
Attack Power:
Special Power: Can shoot when all hearts are full. 
Description: Your first sword - quite weak. Nevertheless this sword is among the most important weapons in the game!
White Sword -
Location: (A5) - Push down the 2nd gravestone from the left in the middle row: An Old man offers the White Sword.
Attack Power:
Special Power: Can shoot when all hearts are full. 
Description: Your second sword - twice as strong as the first Sword. To get this Sword you must have a total of 5 Heart Containers.
Magic Sword -
Location: (E7) - Open Cave: An Old Man offers the Magic Sword between 3:25 - 3:34.
Attack Power:
Special Power: Can shoot when all hearts are full. 
Description: Your third and last sword - twice as strong as the White Sword. Truly mighty!!! For this sword you won't need a special number of Heart Containers because it is Time Related
Wooden Boomerang -
Location: (A2) - Level 2: Kill the Red Goriyas.
Attack Power: Normal -  / Gel & Keese -
Special Power: It kills only Keese and Gel while most other monsters will just be stunned (with the exception of Zora, Pols Voice, DarkNuts, Wizzrobes and the bosses). It will collect items left by monsters like Rupees, Bombs, Fairies...
Description: This nice little weapon comes always back to you when thrown.
Magic Boomerang -
Location: (D1) - Level 3: Kill the Blue Goriyas.
Attack Power: Normal - / Gel & Keese -
Special Power: It kills only Keese and Gel while most other monsters will just be stunned (with the exception of Zora, Pols Voice, DarkNuts, Wizzrobes and the bosses). It will collect items left by monsters like Rupees, Bombs, Fairies...
Description: This Magic Boomerang is faster and flies farther than the Wooden Boomerang.
Mighty Boomerang - 
Location: Time Related Item. You get it between 2:45 - 2:54 and 3:40 - 3:59
Attack Power:
Special Power: It has the same Attack Level like the White Sword and works on all enemies (even on Bosses). It will collect items left by monsters like Rupees, Bombs, Fairies...
Description: This Mighty Boomerang is faster and flies farther than the Magic Boomerang.
Bow -
Location: (A1) - Level 1: In the cellar.
Attack Power: ----
Special Power: ----
Description: Neccessary to shoot Arrows.
Wooden Arrow -
Location: (E2), (G3), (B4) - Buy it at the shop for 80 Rupees.
Attack Power:
Special Power: Monsters like Ghomas are only vulnerable to Arrows.
Description: Arrows are very fast and you can defeat Enemies from a distance. But every Arrow used costs one Rupee!
Silver Arrow -
Location: (C1) - Level 8: In the cellar.
Attack Power:
Special Power: Needed to defeat Ganon.
Description: Arrows are very fast and you can defeat Enemies from a distance. But every Arrow used costs one Rupee!
Bombs -
Location: Mainly left by monsters, found lying around or bought in the shop. Bomb upgrades: (A6) - Level 4 and (E5) - Level 5.
Attack Power:
Special Power: Bombs can break some walls.
Description: Bombs are useful to defeat enemies but should be kept for opening new ways in dungeons or getting special items in the overworld.
Blue Candle -
Location: (E2), (G3) - Buy it at the shop for 60 Rupees.
Attack Power:
Special Power: It can enlightens dark rooms and burn down trees. 
Description: It shoots only one flame per screen. The candlefire is not as important to defeat enemies but to burn trees and get special items at the overworld.
Red Candle -
Location: (F4) - Level 7: In the cellar.
Attack Power:
Special Power: It can enlightens dark rooms and burn down trees.
Description: It shoots unlimited flames per room, but only three flames can burn at the same time. The candlefire is not as important to defeat enemies but to burn trees and get special items at the overworld.
Magic Wand -
Location: (B8) - Level 6: In the cellar.
Attack Power: Beam - / Wand -
Special Power: It shoots a strong Magic Beam like the Wizzrobes. 
Description: Useful if you can't shoot with your sword. Note: on some underworld enemies like Darknuts, Wizzrobes and Pols Voice the Wand is effective but the Beam not!
Magic Book -
Location: (D1) - Level 8: In a secret room.
Attack Power:
Special Power: Make a flame appear every time a Beam shot with the Magic Wand. It can enlighten dark rooms and burn down trees (if something stops the Beam on one).
Description: Upgrade for the Magic Wand.
B, Defence Items
Shield - 
Location: Yours from the beginning.
Defence Power: Protects from Octorok Stones, Moblin Spears and Goriya Boomerangs. 


Description: Protects from Projectiles.
Magic Shield -
Location: Buy it at several shops either for 130 Ruppees (E2), (G3) or 90 Rupees (G8), (E8).
Defence Power: Protects the same as the normal shield and also from various (almost all) Fireballs, including Lynel Swords, Wizzrobe Beams. 


Description: Protects from Projectiles.
Blue Ring -
Location: (B4) - Buy it at the shop for 250 Rupees.
Defence Power: Reduces the damage received from enemies by half. 
Description: Increases Resistence.
Red Ring -
Location: (B1) - Touch the left Armos statue: An Old Man offers the Red Ring between 3:25 - 3:34.
Defence Power: Reduces the damage received from enemies by three quarters. 
Description: Increases Resistence.
Heart Container -
Location: (H1), (B3), (H4), (A1), (C6). You'll also get one for every Dungeon Boss defeated - eight in all!
Defence Power: Increases your number of Hearts.
Description: Increases Health.
Blue Medicine -
Location: Mainly purchased from Old Women in hidden caves for 48 Rupees (C3), (F5), (A8) or for 10 Rupees from the Street Vendor (H8).
Defence Power: Recovers your Hearts. 
Description: Recovers Health.
Red Medicine -
Location: Mainly purchased from Old Women in hidden caves for 60 Rupees (D5), (A8) or for 20 Rupees from the Street Vendor (H8) (buy blue medicine twice). You can also choose between a Heart Container or a red medicine in secret caves (B3), (A1), (C6).
Defence Power: Recovers your Hearts twice (turns into a Blue Medicine after the first use).
Description: Recovers Health.
C, Special Items
Letter -
Location: (H3) - Open Cave: an Old Man offers you the Letter .
Description: Show this Letter to the Old Woman - she then starts to sell her Medicine.
Food -
Location: Buy it in Shops for 60 Rupees - (B4), (G8), (E8).
Description: Used as bait to easily pass or target enemies. Give it to the Hungry Man in Level 5 to get a past him.
Raft -
Location: (A8) - Level 3: In the cellar.
Description: You can get over water wherever you find a pier.
Ocarina -
Location: (B8) - Level 4: In the cellar.
Description: Play it to reveal the entrance to Level 6. Also needed to defeat Digdogger and useful against Pols Voice. If you play it on the Overworld a Whirlwind comes and brings you to previous dungeons. If you are turned up or right as it sweeps you off, you'll be brought a level forward. Down or left will bring you a level backwards.
Stepladder -
Location: (F1) - Level 5: In the cellar.
Description: Very useful item: you can get across small water and lava gaps.
Power Bracelet -
Location: (B7) - Below the 2nd Armos from the left in the top row.
Description: You can move some heavy rocks in the overworld with this item.
D, Field Items
Red Rupee -
Description: Gives you One Rupee.
Blue Rupee -
Description: Gives you Five Rupees.
Heart -
Description: Fills one empty Heart Container.
Fairy -
Description: Fills three empty Heart Containers. If you find a Fairy at a Fairy Pond all Heart Containers will be restored!
Clock -
Description: Freezes all enemies in the screen.
Bomb -
Description: Gives you four Bombs.
E, Dungeon Items
Dungeon Key -
Description: You can unlock one door with it.
Dungeon Compass -
Description: The Triforce Piece will be marked on your Dungeon Map as a red dot.
Dungeon Map -
Description: With it you can see (almost) all rooms the dungeon has.
Triforce Piece -
Description: Collect all eight of them to defeat Ganon.
Triforce of Power -
Description: Win it by defeating Ganon.
A, Overworld Monsters
Red Octorok - 
Hearts taken per hit:
Special Weapon:
Hits to kill:
Effective Weapon:
Left Item:
Location: Grassland and shorelines
Strategy: Block their rocks with the shield and slash them with your sword. Some are faster. Very easy enemies.
Blue Octorok - 
Hearts taken per hit:
Special Weapon:
Hits to kill:
Effective Weapon:
Left Item:
Location: Grassland and shorelines
Strategy: Block their rocks with the shield and slash them with your sword. Some are faster. Still pretty easy enemies.
Zora - 
Hearts taken per hit:
Special Weapon:
Hits to kill:
Effective Weapon:
Left Item:
Location: Nearly all Rivers, Lakes and Oceans
Strategy: Avoid the Fireballs until you have the Magic Shield. You can't defeat Zora with any L1 attack because it regenerates.
Red Leever - 
Hearts taken per hit:
Special Weapon: ----
Hits to kill:
Effective Weapon:
Left Item:
Location: Plains and sandy ground
Strategy: They'll hide in the ground and usually come out directly before you. Take care!
Blue Leever - 
Hearts taken per hit:
Special Weapon: ----
Hits to kill:
Effective Weapon:
Left Item:
Location: Plains, sandy ground and Mountains
Strategy: They'll hide in the ground to usually come out directly before you and are much stronger. Take care!
Red Tektite - 
Hearts taken per hit:
Special Weapon: ----
Hits to kill:
Effective Weapon:
Left Item:
Location: Mountains
Strategy: These hopping monsters are not easy to hit but are quite weak.
Blue Tektite - 
Hearts taken per hit:
Special Weapon: ----
Hits to kill:
Effective Weapon:
Left Item:
Location: Valley (Warp Location (H1))
Strategy: Blue Tektites are slower than the red ones but also more erratic in movement. These hopping monsters are not easy to catch but are quite weak.
Peahat - 
Hearts taken per hit:
Special Weapon: ----
Hits to kill:
Effective Weapon:
Left Item:
Location: Plains, Mountains
Strategy: These monsters are not easy to kill. You've got to wait until they sit still.
Red Moblin - 
Hearts taken per hit:
Special Weapon:
Hits to kill:
Effective Weapon:
Left Item:
Location: Forests
Strategy: Block the spear with your shield. They are not very hard to defeat...
Blue Moblin - 
Hearts taken per hit:
Special Weapon:
Hits to kill:
Effective Weapon:
Left Item:
Location: Forests
Strategy: Block the spear with your shield. While thougher, they are not harder to defeat...
Ghini - 
Hearts taken per hit:
Special Weapon: ----
Hits to kill: (9)
Effective Weapon:
Left Item:
Location: Graveyards
Strategy: They are very resistent and move in 8 directions passing over objects. As long as they are alone they are not a big threat, but if you touch any gravestones more will appear and these will be invulnerable making them very dangerous. However, if you kill the original ghost, they all die, which can be a good way to get lots of rupees.
Armos - 
Hearts taken per hit:
Special Weapon: ----
Hits to kill:
Effective Weapon:
Left Item: ----
Location: Mountains, Forests
Strategy: They come to life if you touch them after 3:08. Some are very, very fast while others are slow. They often hide secrets.
Red Lynel - 
Hearts taken per hit:
Special Weapon:
Hits to kill:
Effective Weapon:
Left Item:
Location: Mountains
Strategy: One of the strongest overworld creature, half horse half man and with a lion's head. They shoot with their swords and their attack can only blocked with a Magic Shield. Be careful!
Blue Lynel - 
Hearts taken per hit:
Special Weapon:
Hits to kill: (8)
Effective Weapon:
Left Item:
Location: Mountains
Strategy: The strongest overworld creature, half horse half man and with a lion's head. They shoot with their swords and their attack can only blocked with a Magic Shield. Be careful!
B, Overworld Traps
Falling Rock - 
Hearts taken per hit:
Location: Mountains
Strategy: They come from above in groups of three. Avoid them!
Whirlwind - 
Hearts taken per hit: ----
Location: Blocks the way to the White Sword (A4)
Strategy: Hard to avoid as extremely erratic. If a whirlwind catches you it will bring you one screen down....
Whirlpool - 
Hearts taken per hit: ----
Location: Blocks the way to the northeast mountains (and Dungeon 5) (H5)
Strategy: Not to avoid. It'll be gone once you collect the 4th Triforce Piece.
Lost Woods - 
Hearts taken per hit: ----
Location: This screen blocks the way to the graveyard by repeating itself whichever way you go (except to the right, which allows you to escape) (H5)
Strategy: Go north, west, south, west!
Gravestones - 
Hearts taken per hit: ---- (A Ghini will appear when touched)
Location: (A6) - Graveyard, (F7) - Level 7 entrance
Strategy: Don't touch them, unless you want more Ghini to die when you kill the one on screen (assuming there is one). Never touch them from below.
Armos Statues - 
Hearts taken per hit: ---- (They'll come to life when touched after 3:08)
Location: Forests, Mountains
Strategy: Don't touch them unless you want to kill an Armos or want to see if it's hiding a secret. Never touch them from below.
C, Underworld Monsters
Gel - 
Hearts taken per hit:
Special Weapon: ----
Hits to kill:
Effective Weapon:
Left Item: ----
Location: Level 1 and from Zols
Strategy: Easy to defeat, but don't underestimate its sudden movements.
Blue Keese - 
Hearts taken per hit:
Special Weapon: ----
Hits to kill:
Effective Weapon:
Left Item: ----
Location: Level 1 - 8
Strategy: Very easy to defeat, but if you can't catch them wait until they stop moving.
Red Keese - 
Hearts taken per hit:
Special Weapon: ----
Hits to kill:
Effective Weapon:
Left Item: ----
Location: From Vires (Level 3 - 4)
Strategy: Red Keeses are faster than Blue Keeses, but as easy to defeat.
Rope - 
Hearts taken per hit:
Special Weapon: ----
Hits to kill:
Effective Weapon:
Left Item:
Location: Level 1, 2, 6
Strategy: Weak monsters but if they see (get in line with) you they'll rush into you.
Stalfos - 
Hearts taken per hit:
Special Weapon: ----
Hits to kill:
Effective Weapon:
Left Item:
Location: Level 1, 2
Strategy: They walk slowly around and wait for your sword...
Red Goriya - 
Hearts taken per hit: Touch - / Boomerang -
Special Weapon:
Hits to kill:
Effective Weapon:
Left Item:
Location: Level 1 - 3
Strategy: Harder enemies (can kill you in three hits at the start) which throw their Boomerang at you. It can be blocked with any Shield.
Blue Goriya - 
Hearts taken per hit:
Special Weapon:
Hits to kill:
Effective Weapon:
Left Item:
Location: Level 1 - 3
Strategy: The Blue Goriyas are faster and tougher than the Red Goriyas. Their Boomerang can be blocked with by any Shield.
Zol - 
Hearts taken per hit:
Special Weapon:
Hits to kill:
Effective Weapon:
Left Item:
Location: Level 2 - 8
Strategy: If they are not killed in one hit (which requires an attack twice as strong as the first sword) they'll split into two Gels. This is bad because Gels give no items. Also be careful not to be too close when they split.
Vire - 
Hearts taken per hit:
Special Weapon:
Hits to kill:
Effective Weapon:
Left Item:
Location: Level 3 - 4
Strategy: Like Zols, if they are not killed by one hit they'll split into two Red Keeses.
Blue Wallmaster - 
Hearts taken per hit:
Special Weapon: ----
Hits to kill:
Effective Weapon:
Left Item:
Location: Level 1, 2, 5
Strategy: They'll appear if you touch the wall. Don't let them catch you or you get a free ride to the dungeon's entrance
Green Wallmaster - 
Hearts taken per hit:
Special Weapon: ----
Hits to kill:
Effective Weapon:
Left Item:
Location: Level 8
Strategy: The Green Wallmonster is faster than the Blue Wallmaster. They'll appear if you touch the wall. Don't let them catch you or you get a free ride to the dungeon's entrance
Red Darknuts - 
Hearts taken per hit:
Special Weapon: ----
Hits to kill:
Effective Weapon:
Left Item:
Location: Level 3 - 5; 7 - 8, Overworld after Sunset (instead of Red Octoroks)!
Strategy: Tough enemies. They can't be damaged from the front. Fortunately they are vulnerable to bombs.
Blue Darknuts - 
Hearts taken per hit:
Special Weapon: ----
Hits to kill: (9)
Effective Weapon:
Left Item:
Location: Level 5, 7, 8, Overworld after Sunset (instead of Blue Octoroks)!
Strategy: Blue Darknuts are faster and harder than the red ones. They can't be damaged from the front.
Like Like - 
Hearts taken per hit:
Special Weapon: ----
Hits to kill: (8)
Effective Weapon:
Left Item: ----
Location: Level 4, 6, 7, 8
Strategy: Annoying enemies who want to eat your Magic Shield. Don't let them catch you, and if they do, continue to attack them!
Pols Voice - 
Hearts taken per hit:
Special Weapon: ----
Hits to kill: (10)
Effective Weapon:
Left Item:
Location: Level 4, 6
Strategy: Strong monsters but luckily very weak to sound... Play your Ocarina whenever you meet them!
Gibdo - 
Hearts taken per hit:
Special Weapon: ----
Hits to kill: (7)
Effective Weapon:
Left Item:
Location: Level 5 - 8
Strategy: Strong but slow monsters. Not difficult.
Red Wizzrobe - 
Hearts taken per hit:
Special Weapon:
Hits to kill:
Effective Weapon:
Left Item:
Location: Level 5, 7 - 8
Strategy: Evil wizards. They appear, shoot their magic at you and disappear. Take them out fast.
Blue Wizzrobe - 
Hearts taken per hit:
Special Weapon:
Hits to kill: (8)
Effective Weapon:
Left Item:
Location: Level 5, 7 - 8
Strategy: Evil wizards. They can phase out and move over anything, lava, water, blocks; yet they can give or take damage. Once in line with you, they can shoot very fast damaging you severely; however, they can't shoot while "phased". The ultimate lesser enemy, fortunately they can be attacked with bombs.
D, Underworld Traps
Statue - 

Hearts taken per hit:
Special Weapon:
Location: Level 3, 5, 7
Strategy: Avoid their Fireballs!
Floortrap - 
Hearts taken per hit:
Location: Level 1 - 8
Strategy: If you step between them, they'll close onto you. Avoid touching them!
Bubble - 
Hearts taken per hit: ----
Location: Level 7 - 8
Strategy: You won'nt be able to strike with your sword for a short time after they touch you. They can't be killed, so stay away.
Blue Bubble & Red Bubble - 

Hearts taken per hit: ----
Location: Level 7 - 8
Strategy: If you touch a Red Bubble you won't be able to strike with your sword until you've either touched a Blue Bubble, used some Medicine or visited a Fairy Pond (stray Faeries won't help). They can't be killed, so stay away.
E, Bosses
Aquamentus -
Hearts taken per hit:
Special Weapon:
Hits to kill: (6)
Effective Weapon:
Location: Level 1
Strategy: He moves slowly and throws three Fireballs at once at you. Avoid the Fireballs (you can't get inbetween them if far away) and use your sword.
Stronger Aquamentus -
Hearts taken per hit: Touch - / Fireball -
Special Weapon:
Hits to kill: Each color - (6)
Effective Weapon:
Location: Level 7, 8
Strategy: After six hits his color will change from green to blue and his Fireballs are thrown faster. After another six hits he will turn to red. He now shoots more Fireballs at a time and they can't be blocked even with the Magic Shield!
Dodongo -
Hearts taken per hit:
Special Weapon: ----
Hits to kill:
Effective Weapon:
Location: Level 2, 5, 8
Strategy: You have to get him to eat two bombs to be defeated. Lay them in his way. When he walks over it, he's going to eat it.
Manhandla -
Hearts taken per hit:
Special Weapon:
Hits to kill: Each head -
Effective Weapon:
Location: Level 3
Strategy: First he moves slowly and throws Fireballs at you. Hit the heads. For each he loses, he'll get faster and faster. A good placed bomb can kill this Boss at once.
Blue Manhandla - 
Hearts taken per hit:
Special Weapon:
Hits to kill: Each head - (8)
Effective Weapon:
Location: Level 8
Strategy: First he moves slowly and throws dozens Fireballs at you. Hit the heads. For each he loses, he'll get faster and faster. Kill him fast, otherwise his heads will grow again. Two good placed bomb can kill this Boss at once.
Moldorm - 
Hearts taken per hit:
Special Weapon: ----
Hits to kill: Each segment -
Effective Weapon:
Location: Level 4, 6
Strategy: This worm is a middleboss. Not very difficult. He'll get shorter and faster as you slay his segments.
Digdogger -
Hearts taken per hit:
Special Weapon: 
Hits to kill: Each Small Digdogger - (8)
Effective Weapon: Big Digdogger - / Small Digdogger -
Location: Level 4, 6
Strategy: Quite a hard Boss! He and his smaller relatives can take much of your energy. Play your Ocarina to shrink (and somehow divide into three) the big Digdogger!
Patra -
Hearts taken per hit: Big Patra - / Small Patra -
Special Weapon: 
Hits to kill: Big Patra - (11) / Each Small Patra - (6)
Effective Weapon:
Location: Level 5, 8
Strategy: This Boss is so simple, I can't believe it's meant to just fly up and down like this. First destroy the eight small flies. After this attack the Big Patra.
Double Patra -
Hearts taken per hit:
Special Weapon: ----
Hits to kill: Each Patra - (15)
Effective Weapon:
Location: Level 7
Strategy: This Double Middleboss is just as simple. Just take them out one at a time.
Ghoma -
Hearts taken per hit: Touch - / Fireball -
Special Weapon:
Hits to kill:
Effective Weapon:
Location: Level 6
Strategy: No big deal, but his Fireballs can't be blocked even with the Magic Shield. Shoot one Wooden Arrow in his eye when it opens.
Blue Ghomas -
Hearts taken per hit: Touch - / Fireball -
Special Weapon:
Hits to kill: Each Ghoma -
Effective Weapon:
Location: Level 8
Strategy: This Double Boss can be annoying as their Fireballs can't be blocked even with the Magic Shield. Shoot three Wooden Arrow in each eye when it is open (or a silver one).
Ganon -
Hearts taken per hit: Touch - / Fireball -
Special Weapon:
Hits to kill: Invisible Ganon - (15) / Stunned Ganon -
Effective Weapon:
Location: Final Area
Strategy: Ganon is invisible. Slash blindly with your sword. You may hit him by luck, but it's better to try and locate where he's going to be by looking at where his Fireballs come from. Keep it up until he is stunned (blue) then quickly shoot a Silver Arrow at him. It's his only weakness.
A, Characters
Boy Mascott - 
The main character and the BS-X Mascott.
Girl Mascott - 
The second character and BS-X Mascott, you can choose her in the menu.
Link - 
You want that classic feel while playing BS Zelda? Then you may want to use a patch for Link.
Old Man - 
He has the most tasks in the game. He gives important items, hints, likes to gamble and sometimes he proves himself actually quite evil and charges you for door repairs or shoots you even! (But only in dungeons, if you attack him first)
Old Woman - 
She concots potions which can be bought in her Medicine Shops!
Merchant - 
Visit him in his Shop and buy important items. He also sells Medicine as a Street Vendor, and he's also sometimes starving...
Pacifist Moblin - 
He hides from the fighting - and offers money for others to respect his secrecy!
Fairy - 
Visit her at her Fairy Pond and she will let you recover your full health. Free her from a monster and she will recover three hearts.
Zelda - 
Same as usual, Milady Zelda? - Same as usual Link... Go and save her!
Ganon - 
Prince of Darkness, bearer of the Triforce of Power (actually he stole it)... and a centuries old pig! Rid Hyrule of this threat.
B, Passageways
Caves -  -
-  -
- 
You'll always find something interesting in Caves. Some caves have to be bombed open, trees have to be burned or move a gravestone or a rock with your Power Bracelet...
Dungeons Passways -  -
-  -
-  -
- 
Make your way through dungeons by walking through doors. Most are open, but for others Dungeon Keys are needed and for some you might have to solve a riddle: move a block, kill all enemies... some walls can also be breached with bombs.
C, Lost Sprites
Gleeok -  -
- 
Known as the head-loosing dragon from "The Legend of Zelda". Not counting Ganon, he was the stronger boss.
Lamnolas -  -
- 
A speeding creature from "The Legend of Zelda" which is not part of BS Zelda. He was one of the stronger lesser enemies... I'm noticing a pattern here.
Magic Key - 
With this Magic Key you basically had infinitive keys in "The Legend of Zelda".
A, Introduction
The Classic Edition is a project by me, Con, which turns BS Zelda into a "real"
Legend of Zelda. You will play with classic characters, Link and Zelda, have Triforce Symbols instead of crosses and... play without the BS-X Timer!
I called this project "The Legend of Zelda - Fourth Quest", because it can be regarded as a fourth quest to LoZ, Nes (and BS Zelda - Third Quest) without any canon problems.
The core of this project is a time patch by Dreamer_Nom which disables the timer, hides it and forwards the game triforce related.
Unfortunately DN left this patch inperfect, before he disappeared: the blue candle was never shop equipment (this problem occured due to Roto's patch) and the
whirlpool didn't vanish after Dungeon 4, what happened because of a wrong time setting.
I waited 2 years to find a qualified hacker to solve these problems, but since nobody was able or interested I took the project in my own hands and started from point zero getting through the djungle of ASM hacking... and with the help of Tre and others I am proud and lucky to tell you that my mission is accomplished.
B, Timeplan
The Triforce is an ultimate source of power. Thus, as more pieces you collect as more is your might increased. Nevertheless, some events won't last forever (this is because of the ingame's rom nature).
Beginning:
- nothing happens until you've reached the First Triforce piece
Directly after getting First Triforce Piece:
- the time related Heart Container appears, and it is stabled until the you get the 7th Triforce Piece. Come on, you run directly into it - if you don't grab it, it's your fault!
After getting the Second Triforce Piece
- the Blue Candle is available until the end of the game
After getting the Third Triforce Piece
- the Tornadoes vanish until the end of the game
After getting the Fourth Triforce Piece
- the Lost Woods' magic and Whirlpool disappear until the end
- the Street Vendor appears until you get the 6th Triforce Piece
After getting the Fifth Triforce Piece
- the Flute Podest that opens level 6 appears and stays until the end of the game
- you have Half Shop Prices until you get the 7th Triforce Piece
After getting the Sixth Triforce Piece
- the Amos wake up
- you obtain the Mighty Boomerang keep it until the end of the game
- the Red Ring and the Master Sword are available until the end of the game
After getting the Seventh Triforce Piece
- you get Unlimited Bombs until the end
After getting the Eighth Triforce Piece
- go, kill Ganon !
- you get the Light Sword which always shoots
C, Extra items
Red Ocarina - 
Location: (D7) - Push a block for a staircase with the moblin.
Description: The first time you play it, a whirlwind will bring you to a secret screen with the Magic Key. Now you will hear a tune whenever you enter a screen with an undiscovered secret
Magic Key -
Location: (B6) - In the cave, after you played the red ocarina
Description: Will give you unlimited keys.
A, Credits
Credits for the people who wrote this walkthrough:
Original walkthrough made by Garrett
Revised by Con and Tre.
Additional stuff made by Duke Serkol.
B, Contact
Questions, comments or advice for improvement can be sent to: Con, Garrett and Duke Serkol.
C, Legal
Made for The BS Zelda Homepage.
This FAQ cannot be distributed on other sites, in books, magazines or in any other
form of printed or electronic media (CDs, etc.) without the permission of Con or Duke Serkol. It may not be
given away as some sort of prize or bonus with a purchase, and it may not be
used for promotional or profitable purposes.
Any characters, names, or other objects are copyright of their respective
companies. This document and its author are in no way affiliated with any
company involved with this game.
D, Final Word
It has been long since 02.11.99 when The BS Zelda Homepage begun its mission. In
this time, we have achieved results that surprised ourselves. For this, we have many skillful
patchers that we contacted and worked with over the years to thank. People like Roto, Dreamer Nom, Euclid, Duke Serkol, Con, Bumpus and others still. Thanks to them, this game is as good as fixed and its sibling
Ancient Stone Tablets has significantly improved.
Without them, I am sure, we would not have been able to promote the game as far as we did.
Six years ago very few fans even knew what BS Zelda was. Thankfully the situation has changed
much since then and we would like to believe that this site, together with those people, played
an important role in this change.
Our task is not over yet, there are still flaws to fix in both games, and we hope that more
patchers will help us restore these games to the splendor that is rightfully theirs.
May the future shiny brightly for the BS Zelda games!
E, Other Versions
1, Doc Version for MS Word, ca. 300 kB
2, PDF Version for Acrobat Reader, ca. 900 kB
3, TXT Version (ca. 90 kB)
![]()